Changing Rubik's Cube sticker labels
2007 March 15
It is an established fact the the sticker labels of rubik’s cubes deteriorate fast. For less than a year of using my newly ordered 3x3 cube from http://www.rubiks.com, 4 out of 6 faces were discolored. The “protective” plastic coating of the cube has a greater bonding strength with the colors than the sticker base. So as the stickers peel, so does the color. In the end, one will end up with a purely white cube.
I searched the Internet for methods on how to replace it. The most famous query from a Google search is to buy the official labels from rubiks.com. As a resident of the Philippines, this is the least feasible solution. I scoured various stationary, school and office supplies shops to look for the “official” (yellow, blue, green red, orange) but was not able to find all of the colors.
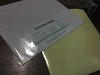 In order to have consistency among sticker labels, the best solution was to buy a clean sheet of sticker paper and print on it. These sticker labels were bought from National Bookstore along Katipunan Avenue. The yellow sheet is the clear acetate to protect the colors from fading in the future.
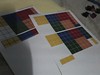 The next step is to print on the sticker labels. Using an HP Deskjet 3745 printer, a 600 DPI print of the labels were made. I also uploaded the sticker sheet so anyone can print the sticker labels. Measuring the dimensions from an official cube, each square label has a length of 0.625 inches. (Note: there are extra square labels in the sheet because I was also planning to recondition my Fused cube).
The next step before cutting up the labels is to insert the protective acetate cover. It must be laid out carefully. I think it is preferrable to use a roller-like device to lay down the sticker on the sheet to spread the acetate evenly. My attempt was a failure because I don’t have a roller-like thingie. What happend was very catastrophic. Bubbles formed on the sheet rendering my labels useless. Then off to the garbage bin the labels go.
Since the cube is useless without proper labels, I attempted a method using local materials available in a local supplies store here in the Philippines. I bought assorted art paper from National Bookstore. To efficiently (or hackishly) insert labels, double-sided tape was laid on the back of each color of an art paper sheet. Afterwards the art paper was cut-off according to the rectangular shape of the tape. Then I cut away square portions of the tape-art paper combination to be laid on the cube itself. Afterwards transparent adhesive (aka “Scotch”) tape was inserted on top of the art paper for protection. The result of the double sided tape - art paper - transparent adhesive tape combination can be seen below:

Not bad eh? But after playing with my reconditioned cube for a while the labels started to deteriorate (again!). In my next reconditioning attempt, I will try to use clear nail polish for the protection layer and see the difference.
Technorati Tags: sticker label, rubik’s cube, cubing, paper crafts